Category Archives: Clarion 7

Coming up with 7.2

There was a recent thread in the news group where a lot of people were saying how much they used (and missed) the availability of a list of an Applications’ Procedures. Seems that code completion wasn’t the best option when you can’t remember the name of the Procedure. And its quite understandable when you have many many procedures, possibly hundreds, in your .App. So thanks to some quick work by Diego, Scott and Alexey, we were able to slip this this new feature into the 7.2 release; the Data pad now has a “Procedures” node, and when selected it lists all template based procedures, the Procedures node is only activated when you are in any of the editors, and dbl-clicking on a procedure name in the list inserts the procedure name into the editor. The Procedures list also has a Windows Explorer style incremental locator.

proclist

Update for 7.1

An update for 7.1 is going out today, there are no new features introduced in this release, but there is a change (for the better) that you’ll soon have:

CHANGE: Code generation only executes from the application tree window, this prevents generation with partial or unsaved changes and ensures consistency for code generation.

What this new change boils down to is a subtle (or not so subtle, depending on your work style) change to where and when you can initiate code generation. In all previous releases the IDE was very loose about allowing you to initiate code generation from just about anywhere within the Application Generator dialogs and supporting components (Designers, Embed Editor, etc.), without consideration for the current state of uncommitted changes, and unfortunately this flexibility opened up avenues for introducing problems into the generated code. Imagine if you changed a Window or Report and exited the Designer, now the structure has changed but you haven’t committed the changes at the Procedure level, but while still on Procedure Properties you execute code generation. What should generate? Should AppGen somehow restore the old structure (probably not what you want), or auto-commit the changes to the Procedure, again not a decision that should happen without an explicit choice by the developer. The implemented solution for this is very simple, the AppGen will inform you to return to the main window, which in turn forces you to either save the partial changes or abort them. The result is 100% consistency in the generated code, at the cost of having to make an explicit decision to save or abort changes at the Procedure level. Besides this change (for the better and safer) there are a good number of other fixes. You can read the entire list here

XML with Clarion 7 – Part 2

For this article we’ll dive further into the processing of XML files. There are two types of XML we may encounter, #1 well formed XML, #2 unknown XML files.

#1 (well formed XML) documents are XML files that are correct in their syntax and will not require any validation, for this type of file we know from where they come from, and we know their format.
#2 (unknown XML) are documents that we don’t know where they come from, or if they are syntactically correct and well formed.
For the second type we won’t worry about because in this article we will be talking about how to read well formed files, the type of files that are created by  an automated process  to communicate between programs and share information, all that is done using well formed, well known XML documents.

When we want to communicate with another program through an XML document we need to be able to write that document and to read that document.
In this type of exchange the XML format used in that document is a well known format.
We already saw how to write our XML document using the XMLGenerator class which creates a well formed document, and now we need to Read a “received” document.

The Reading.

For reading an XML document a new class was recently added in C7; that class is the XMLParser. The XMLParser is a class that reads an XML document file and processes it, the document must be a valid document because the XMLParser does not validate the document, that is why we call the XMLParser a non-validating XML parser.

Is a no-validating parser bad?
Well no, it is not bad, it is just that, a non-validating parser.
Because we will be reading a known file we don’t need to validate the files and we don’t need to loose any time in doing that.
We are not creating a program that can read any random XML file, we only need to read a specific XML document.
For that kind of file we don’t need any validation, we know the format and it is what we are expecting.

The XMLParser included in C7 is very fast and its memory usage is very low. The parser does not store or create any structure with the XML data, instead it uses an interface and calls each method of that interface passing the XML Data.
To use the parser the IXmlNotify interface needs to be implemented.

The IXmlNotify is an interface declared in the file QuickXMLParser.INC, the same file where the XMLParser is declared.

The question is then:

Why I need to implement the IXmlNotify to parse my XML file?
The XMLParser does all the work of parsing the file but it does not know what to do with the data that comes from the XML Document.
We need to “tell” the parser what to do with the data. Or in this case the parser will just inform us that it found some data and let us decide what to do with it.
So the parser just reads the data and passes it to us.

How is the data is passed to us?
The parser calls the correct methods from the IXmlNotify interface based on the data that it reads.

A quick look into the IXmlNotify interface will show that the methods are very simple.

IXmlNotify      INTERFACE
FoundNode           PROCEDURE( STRING name, STRING  attributes )
FoundElement        PROCEDURE( STRING name, STRING  value, STRING  attributes )
CloseElement        PROCEDURE( STRING name)
StartElement        PROCEDURE( STRING name, STRING  value, STRING  attributes )
EndElement          PROCEDURE( STRING name, STRING  value, STRING  attributes )
FoundComment        PROCEDURE( STRING Comment)
FoundHeader         PROCEDURE( STRING attributes)
CloseHeader         PROCEDURE()
FoundAttribute      PROCEDURE( STRING tagname, STRING name, STRING  value )
                END

Not that many methods to implement, right?

It is easy to implement the IXmlNotify, just declare a class like this:

MyClass CLASS,IMPLEMENTS(IXmlNotify)
END

And implement the IXmlNotify methods like:

MyClass.IXmlNotify.FoundNode           PROCEDURE( STRING name, STRING  attributes )
CODE

In each of the methods you implement you just write the code that is needed every time the parser finds some data that you are interested in.
Remember that this is not a general purpose parser so you will know exactly the data that you will be receiving.

After you have you class implemented just call the parser like:

lXMLParser XMLParser
LOC:XMLStream  STRING(1024)
CODE
lXMLParser.Parse(LOC:XMLStream,MyClass.IXmlNotify)

Note: you can declare your string on run time based on the size of the XML file or you can receive the stream from a web server,etc.

Most of the time you will have to parse a FILE, and that is why we extended the parser class to support a FILE name.

You still need to tell the Parser what to do with the data that it is parsing, but now instead of implementing the IXmlNotify interface you just derive the VIRTUAL methods needed.
And after that you just call your class like this:

XML.Parse(fileName)

Only one method call and the XML Document was parsed and the data was processed as you indicated.
With the Virtual methods you only derive the methods that are called with the data you are interested in, so you don’t need to derive all the methods.

The following are the all the methods that are virtuals

XmlNotifyFoundNode           PROCEDURE(STRING name, STRING  attributes),VIRTUAL
XmlNotifyCloseNode           PROCEDURE(STRING name),VIRTUAL
XmlNotifyFoundElement        PROCEDURE(STRING name, STRING  value, STRING  attributes),VIRTUAL
XmlNotifyCloseElement        PROCEDURE(STRING name),VIRTUAL
XmlNotifyStartElement        PROCEDURE(STRING name, STRING  value, STRING  attributes),VIRTUAL
XmlNotifyEndElement          PROCEDURE(STRING name, STRING  value, STRING  attributes),VIRTUAL
XmlNotifyFoundComment        PROCEDURE(STRING Comment),VIRTUAL
XmlNotifyFoundHeader         PROCEDURE(STRING attributes),VIRTUAL
XmlNotifyCloseHeader         PROCEDURE(),VIRTUAL
XmlNotifyFoundAttribute      PROCEDURE(STRING tagname, STRING name, STRING  value),VIRTUAL

As you can see each one match a method in the IXmlNotify.

Summarizing both articles, an XML file is just a formatted text file, we can read the data contained by hand using a simple ASCII FILE but then we need to parse the file to extract the content, to make that process much easier we use the XMLFileParser class. To create a new XML file instead of just writing out the text we use the XMLGenerator class to simplify the process of creating the Tags and maintain the open/close of notation tags, also it ensures that we create a well formed XML document, and gives us the flexibility to create any type of XML document that we need in our program.

Attached is an example on how to create a class that derives the methods to load a tree with the parsed document.

part2_xmlparser

Template Tips #3 – #ATEND vs #AT(%AfterGeneratedApplication)

It looks like the embed %AfterGeneratedApplication is a very popular embed these days.
We already talked about it in the Template Tips #2 post where we compare it with the #AT(%ProgramEnd). Now we’ll compare #AT(%AfterGeneratedApplication) with #ATEND, and we’ll explain which of these is appropriate for a given task.

Why do we compare #ATEND with #AT(%AfterGeneratedApplication) ?
Because both of these are executed at the end of the code generation process (when we click on the Generate button).
Some 3rd Party Templates have the need to execute code that requires the App to be have been generated, and you’ll find they make use of #ATEND or #AT(%AfterGeneratedApplication).

All of the templates support #ATEND, but we’ll focus on the #APPLICATION #ATEND embed.
The #ATEND is comparable to a Destructor of a class, it is executed at the end of a templates code generation cycle, and the purpose is typically to execute some clean up code. When I mention clean up code I’m not talking about generating backups, creating extra files, or doing some extra  processing, etc. I’m talking about cleaning up template symbol values. Any other processing should not be executed in the #ATEND.

One of the reasons additional processing should not be executed in the #ATEND is that the #ATEND is similar to a Class Destructor, and that means the scope of the template is already ending, so just like in any other Class Destructor. you should not be creating new instances of anything at that point.

Another reason, that is more related to the templates is the Embeditor. What does the Embeditor have to do with the #APPLICATION #ATEND?
Well if you inspect the #APPLICATION code closely you will see that there is one magic part that make the Embeditor work.

I’m talking about this code:

#IF (%EditProcedure)            #! Special for editing embedded source in context
  #CREATE(%EditFilename)
  #FIND(%ModuleProcedure,%EditProcedure)
  #FIX(%Procedure,%ModuleProcedure)           #! Fix current procedure
  #MESSAGE('Generating Module:    ' & %Module,1) #! Post generation message
  #MESSAGE('Generating Procedure: ' & %Procedure,2) #! Post generation message
  #GENERATE(%Procedure)                       #! Generate procedure code
  #COMMENT(60)                                #!Set comment alignment to column 60
  #CLOSE
  #ABORT                                      #!Stop execution of any other code
#ENDIF

Yes, the Embeditor code is just the #GENERATION of the procedure with a little bit of magic.

Because this code is executed in the #APPLICATION section of the template we are expecting the #APPLICATION #ATEND to be executed.
Actually everything would be executed if it was not for the #ABORT at the end of the above code.
So if you are using the #ATEND, you are not only adding code to the equivalence of a Class Destructor, but you are also adding code that will always be executed unless you check for the value of the %EditFilename symbol. If the value of %EditFilename is null then you can be sure that you are in regular code generation, and not in the Embeditor generation. This is a very important point.

Where does the #AT(%AfterGeneratedApplication) fit into all this code generation?
Well the #EMBED(%AfterGeneratedApplication) is located at the end of the #APPLICATION template, it’s the last code to be generated before the #ATEND, but the big difference is that it only executes when we are generating the #APPLICATION during regular code generation. The execution of that embed will not happen on the Embeditor generation because of the #ABORT that we already mentioned.

The conclusion, if you need to execute code at the end of the Application generation process, I always recommend the use of the #AT(%AfterGeneratedApplication) instead of the #ATEND. And always try to use a PRIORITY, that will make other templates play nice with yours.

XML with Clarion 7

As with any other file format there are two basic processes that can be done with XML files; Reading and Writing.
C7 supports doing both in many ways, without the need of any additional tools.
In this article we’ll focus on two different methods, one for writing and one for reading.

The writing.

The method discussed for writing is not new to C7 but it was never used in this way.
I’m talking about the XMLGenerator class, the same class as used in the Report Output templates.
Most of the classes used in the Report Output were designed to be used independent of the Report itself.
The XMLGenerator is no exception, and that is why it can be used in a very simple way to create XML files by hand coding the calls to the XMLGenerator methods.

The class has methods to create an in memory XML document and once that is done we can flush the
content to a file.

The methods are self-documented in the functionality, but lets introduce some code.

INCLUDE('ABPRXML.INC'),ONCE
XML XMLGenerator
  CODE
XML.Init('breakfast_menu.XML')
XML.OpenDocument()
XML.SetEncoding('ISO-8859-1')
XML.SetRootTag('breakfast_menu')
XML.AddComment('The root tag is the first tag in the doc')
XML.AddTag('food','')
XML.AddAttribute('recordNumber','1','food')
XML.CloseDocument()

First, as with any class contained within a separate module we need to include the module.
the class is declared in ABPRXML.INC
After that we create a new class instance of type XMLGenerator that we conveniently call XML

After that we call the Init method passing the xml file name we want to create.

XML.Init(‘breakfast_menu.XML’)

Then we open the document calling the OpenDocument()
And start to create the document content.

XML.OpenDocument()

The class supports many formats for its XML. In this case we use a single root node
that we set by calling the SetRootTag method.

XML.SetRootTag(‘breakfast_menu’)

After that we need to start adding nodes to our tree.

XML.AddTag(‘food’,”)

The Tags can have both attributes and content.
In this case we add attributes to the last added Tag named ‘food’ with the AddAttribute method.

XML.AddAttribute(‘recordNumber’,’1′,’food’)

After adding all our Tags and Attributes we just need to close the document and the content will be written to disk.

XML.CloseDocument()

Some of the methods used to add content are:

SetRootTag           PROCEDURE(STRING pRootTag)
AddComment           PROCEDURE(STRING pComment)
AddTag               PROCEDURE(STRING pName,STRING pValue,BYTE pIsCData=0,<STRING pParent>)
SetTagValue          PROCEDURE(STRING pTagName,STRING pValue,BYTE pIsCData=0)
AddAttribute         PROCEDURE(STRING pName,STRING pValue,STRING pTagName)

Some of the methods to modify properties of the XML document are:

AddXMLHeaderAttribute   PROCEDURE(STRING pName,STRING pValue)
SetEncoding             PROCEDURE(STRING pEncoding)
SetXSL                  PROCEDURE(STRING pXSLFileName)
SetUseCRLF              PROCEDURE(BYTE pTrue=1)

As you can see, you can create any type of XML document, writing just a little code.
You don’t have to worry about the formatting or strings or opening closing Tags, or anything, just call
the methods and the class will create the document for you.

Just remember that the physical file does not exist until you close the document.

Attached in this document is the full example to generate the XML file.

In the next Part 2 of this article we will be discussing about reading this document using Clarion 7

NOTE: This class is part of the Report output Generator to XML and is included in C7 EE package and can be added to C7 PE

part1_xmlgenerator

Project Options and fixing Errors in Embedded Source

This article reviews the essentials of the project system of Clarion 7, how it interacts with the application generator’s embed points, and the options that you have available to control or change the default behavior of the IDE.

Understanding these options will make you more efficient and productive in the Clarion 7 IDE.

We’ll start with an overview of the project system, discuss the origins of generated source code, and finish with the options available that control how you can edit errors in embeds when needed.

blk2blue4

Controlling Source Generation

Regarding the action of building a program created with a Clarion application file, Clarion 7 is the most flexible IDE in the product’s history.

You can just generate source, generate source and make (build), and generate source, make (build), and then run the compiled program from the IDE.

Make (or Build) refers to the process of compiling and linking source to your output project target (EXE, DLL or LIB)

You can perform these actions from the Applications Pad, or from the IDE toolbar:

gbrbuttons1

The highlighted IDE toolbar buttons shown in the above image are only enabled when an Application is opened for editing.

By comparison, the Applications Pad can affects all applications contained in the current Solution. How you process the Generate, Generate and Build, and Generate Build and Run button is controlled from the button drop list options:
apppadmenu1

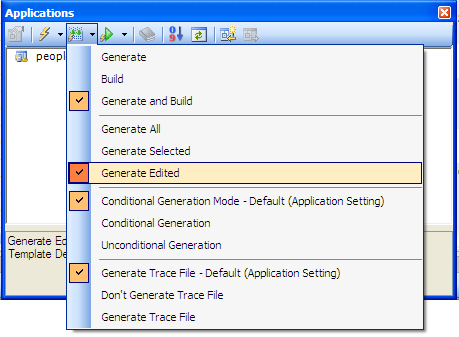
Setting the Applications Pad to Generate Edited will perform the same actions as the buttons on the IDE toolbar.

And here is another important tip:

All buttons on the IDE toolbar and Applications Pad that display a “lightning bolt” will always affect the source generation of applications.

The following buttons (Build and Rebuild):

buildrebuild1

…do NOT cause the source code generation;  these buttons only run a “Build” against the source modules that already exists on disk.

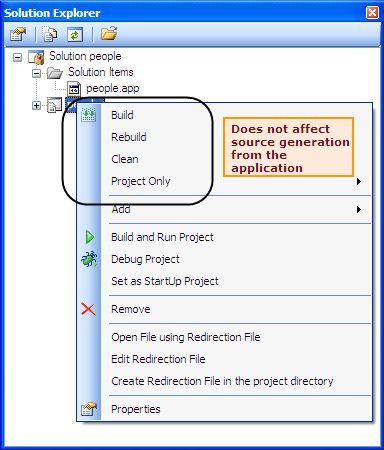
The same fact; “Build does not cause the Application Generator to generate code” applies to all Build options selected from the Solution Explorer:

projectbuilds1

blk2blue5

When bad things happen to good developers – Coding Errors

Let’s face it, stuff happens. The “stuff” that I’m referring to is errors in the source code that are generated from two basic sources of any application.

Code that is generated by the templates
We can break this down a little further. Since templates are read when loading an application, it is possible that something in your dictionary could cause bad code to be generated. Primarily this is from two areas of the dictionary; Triggers and Initial Values. A good tip here is to “mark” your code in the dictionary with a comment, like “DCT generated” or something like that.

You can also cause errors in the generated code by entering incorrect values in template prompts in the Application. Examples of this can be a bad Record Filter expression, incorrect or undefined variable names, etc. In most cases, when a template prompt is looking for data, you will be prompted by one of several selection dialogs (Select a File, Select a Key, Select a Column, etc.)

Code that is generated from embeds
Embeds allow developers to modify or extend the functionality of the base templates by adding additional source code. Clarion provides two views of embeds.

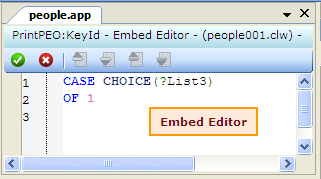
The Embed Editor is located in every procedure’s Embed tab. There is a hierarchical tree of entry points, and by default these embed points open a stand-alone editor that only applies to that selected embed point.

embededitor1

embededitor21

Embeditor (Source Context Editor)
The second view of embeds is the context view. In other words, how does your embed code fit in the context of the template generated code and other embed points? This is also called the Source Embeditor.

You can access the Source Embeditor in several ways:

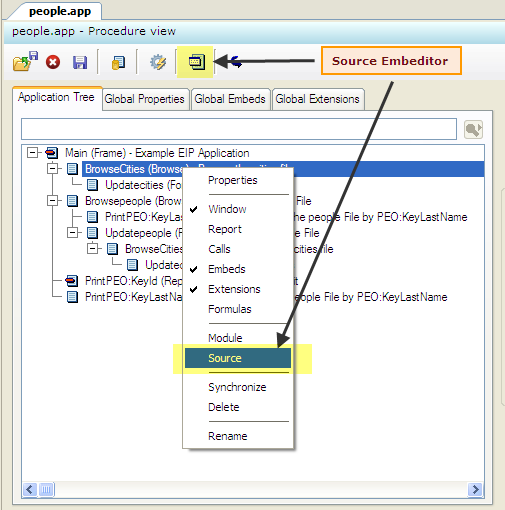
Right-click on any procedure in the Application tree, and select Source from the popup menu, or press the Source Embeditor toolbar button as shown below:

sourceembeditor11

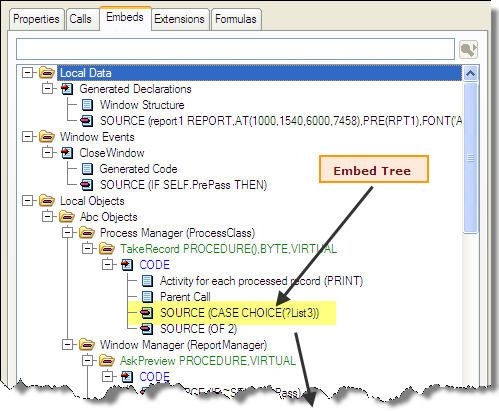
From the Embeds tab:

sourceembeditor21

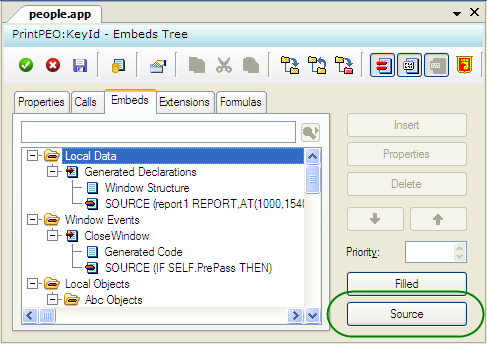
…and if you’ve never seen it before, here is the Source Embeditor:

sourceembeditor31

blk2blue6

Putting it all Together
With what was just discussed above, let’s now put it all together.

When you press one of the options that generates source from the Application Generator…

sourcegeneration1

…and the compiler detects errors, what source editor will be launched from the Errors Pad?

The options to control what source editor will open is controlled by settings in the Application Options.

To open the Application Options dialog, the application editor must be closed. Find this dialog and open it from the IDE Tools Menu (Tools > Application Options).

There are three settings in the Applications Options that control your editor options.

In the Application tab (the first tab you see when the Application Options is opened), find the following option:

option11

When working in the application editor, this option should always be OFF if you want items from the Errors Pad to open up in your favorite embed editor.

With this option turned ON, ALL errors will always open the generated CLW source file, and if you edit errors and then later regenerate source from the Application Generator, your changes will be lost. Only use this option if you are simply testing or prototyping a coding scenario.

The next two options are found in the Application Options Embed Editor tab:
option21

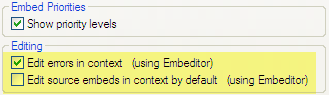
The Edit errors in context (using Embeditor) option will open the Source Embeditor by default from the Errors Pad when this option is checked. When unchecked, clicking on errors in the Errors Pad will open the Embed Editor by default.

Here is a VERY important point:

The Source Embeditor (or embed editor) will open ONLY if the error in the Errors Pad is caused by an EMBED error.

If the error is caused by bad dictionary information (like triggers or initial values), bad template entries, OR an embed that CAUSES bad GENERATED code (like a misplaced END statement), the error pad will ALWAYS open the CLW instead. So in nearly all cases except for the last one, when clicking on an error results in opening the CLW, you can be certain that the error is caused by an incorrect template setting or an error introduced in the Dictionary.

The last option, Edit source embeds in context by default (Using Embeditor), does not affect how errors are processed, but instead controls what editor to use when opening an embed in the Embed Tree found in the Embeds tab.

Summary
When it comes to handling coding errors in an efficient and productive manner, you need to know your project generation options in the Clarion 7 IDE, and know that errors can occur from two different application sources (templates or embeds), and ONLY errors from embed points will open the embed editor of your choice. The embed editor that you open (Embed Editor or Source Embeditor) is controlled by settings found in the Application Options window.

We recommend that you set the Edit embedded source errors in generated code option to OFF (unchecked) and the Edit errors in context (using Embeditor) to ON (checked). These are the default settings of a newly installed Clarion 7 IDE.

Happy programming!

Template Tips #2

We found that some 3rd party templates that use #EXPORT or some other output are generating text in the middle of the generation of the APP itself. This can be very dangerous as it can “break” the code generation for the current module, leaving the user of that template with a partially generated file, or no file generated at all.

We also found some templates are sometimes using the wrong embeds to call its functionality, and that can create a problem when the template fails for any error.

The side efect of both of these template coding errors are code generation errors in the application generated source. So for templates developers we strongly encourage you to check the embeds you use and the location to ensure you are not generating code that can fail in the middle of the application generation process.

One of the changes needed by some 3rd party templates is the use of the embed:
#AT(%ProgramEnd)

this MUST be changed to:
#AT(%AfterGeneratedApplication)

The %AfterGeneratedApplication embed should be used for any side processing and code generation that is not related to the
main code generation of the APP.

We recommend that if you have a 3rd party tool that does some extra processing with the APP to take a look at the code yourself or send a query to the developer of that tool and ask them to ensure their template is not doing any processing in the wrong embed (#AT(%ProgramEnd).

Automated Import and Export of Applications and Dictionaries

Clarion 7.1 added the ability to automatically import and export .App and .Dct files to/from their text representations.  This was primarily added for use with version control systems like Subversion, but developers may also find it useful for automated backup purposes.

With this system any time a dictionary or application is saved it is automatically exported to text.  If you load a dictionary or application and the text file has a newer time-stamp then the binary file, then the text file will be loaded into the binary file.  With this system you can then check in and check out the text representation of your files into your version control system, and the IDE will automate updating the binary files.   Further, if you are using Subversion as your version control system you can see the history of your file via the History tab (shown in the image below) appears at the bottom of the DCT Explorer or Application View.

The History tab displays the version history pulled from your SVN repository.

dcthistory

ClarionCl.exe is also auto import/export enabled.  So if you use another new feature of Clarion 7.1 (Enterprise Edition) to generate an application, the .App and .Dct files will be updated if the timestamp of the text file is newer then the binary file.  This allows you to use automated build tools like CruiseControl.NET to build your Clarion applications.

To enable automated import/export of files go to Tools/Options/General/Binary File auto-export/import.  You will then have a screen similar to the image below.

importexportconfig

The import/export automation does its work on a background thread, so you should not see any impact on your normal work flow.

Template Writing Tips

This is one of many posts to come with advice and tips about things you should do, and things to avoid, when writing Templates. It is intended to help developers who write templates to validate their templates, and to implement some best practices to ensure the templates they deliver work as expected.

The template language is very strict in its syntax, and blank spaces/lines can have a big impact. Spaces where they are not expected are evil. A blank line in the templates will generate a blank line in the generated code, but where that blank line lands in the generated code depends upon where that blank line is within the template code.

Some areas of a template are not meant to generate code, for example #PROMPTs representing the UI. Some templates, like an Extension template, are not supposed to contain any generated code except within #ATs where the code is inserted into an #EMBED.

If a blank line is found in a template, but in a place that is not correct, like between #PROMPTs, or outside a #AT in an Extension template, the code generator will push that line into the generated code, but because the blank line was in an incorrect location there is no explicit place to insert that blank line, and it will add it at the beginning of the block of generated code. To summarize, blank lines in a template are good, except when they are somewhere they are not supposed to be.

Blank lines intended to make the template code easier to read should be always be replaced with #! in column 1 (or just removed). There isn’t a blank line “statement” in the template language, and the reason for that is so that you don’t not mix template language code, with generated output text. Using something like #!———- is much better than a blank line, better in that it is safer and it is more visual.

Some places where a blank line should not be placed:

In any template between a #PROMPT or any other UI code (#SHEET,#TAB,etc.).
In #EXTENSION templates any blank line outside an #AT/#ENDAT block is incorrect.
In a #UTILITY template any blank line outside the scope of an #OPEN or #CREATE is incorrect.
In any template, any blank line used as a separator between #DECLARE statements or as a separator between any other statement is incorrect.

As a golden rule, if the blank line is not intended to be output to the generated code, then the blank line should be replaced by a #! in column 1, or just removed.

LastChanceHook

Geoff Thomson from Capesoft asked me about an example on how to override the RTL’s internal exception handler.   I think this is a topic that is likely of interest to many Clarion developers and warrants an example, so here we go.

Overview

PROP:LastChanceHook is a write-only SYSTEM property, which allows you to specify your own function that will be invoked if an exception occurs. The hook function allows you to display information about the exception and choose one of the following actions:

  • Continue execution of the thread where the exception occurred (unless the exception is fatal)
  • Stop the thread (or the entire process if the exception occurred in the main process thread) without invoking the RTL’s internal exception handler
  • Invoke the RTL’s internal exception handler

    This allows you to catch an exception, and if it is non-fatal you can allow your end users to continue executing your program even when an exception has occurred in one of its threads.


    How It Works

    Your function, which you assign to the SYSTEM{PROP:LastChanceHook} property has to have a prototype of:

    HookProc (*ICWExceptionInfo),LONG

    The ICWExceptionInfo parameter is an interface declared in CWEXCPT.INT which you’ll find in your .Libsrc folder.

    The result returned by the hooked function is evaluated as follows:

    • If the result is equal to Zero, the RTL executes its own internal exception handler dialog to show information about the exception and subsequently perform the action chosen by the end user.
    • If a Positive number is returned, the RTL stops the thread (or the entire process if the exception occurred in the main process thread) without invoking the RTL exception handler.
    • If a Negative number is returned, the program will try to continue from the point of the exception. Note, if the exception is non-continuable, this result is ignored and treated as equal to Zero.

    So in our example we start with this code:


    PROGRAM

    INCLUDE(‘CWEXCPT.INT’),ONCE

    MAP
    Test (LONG,LONG)
    Hook (*ICWExceptionInfo),LONG
    HEX (LONG),STRING,PRIVATE
    MODULE(”)
    MessageBox (UNSIGNED, CONST *CSTRING, CONST *CSTRING, UNSIGNED),SIGNED,PROC,PASCAL,NAME(‘MessageBoxA’)
    END

    END

    MB_ICONHAND EQUATE(00000010h)

    CODE
    SYSTEM{PROP:LastChanceHook} = ADDRESS (Hook)
    Test (10, 0)  ! causes an exception
    RETURN

    In this example the Procedure named “Hook” is assigned as our exception handler. That’s the only Procedure we are concerned with, the others are just there to help make the example work by 1) causing an exception and 2) informing the user about the exception. Next we have:


    ! ------------------------------------------------------------------------------

    Hook PROCEDURE (*ICWExceptionInfo info)

    S CSTRING(1024)
    Caption CSTRING(256)

    CODE
    IF info &= NULL
    RETURN 0
    END

    Caption = ‘Exception ‘ & HEX (info.ExceptionCode()) & ‘ at ‘ & HEX (info.ExceptionAddress())
    S = ‘Registers’ & |
    ‘<13,10>EAX=’ & HEX (info.Register (i386_Register:Reg32_EAX)) & |
    ‘ EBX=’ & HEX (info.Register (i386_Register:Reg32_EBX)) & |
    ‘ ECX=’ & HEX (info.Register (i386_Register:Reg32_ECX)) & |
    ‘ EDX=’ & HEX (info.Register (i386_Register:Reg32_EDX)) & |
    ‘<13,10>ESI=’ & HEX (info.Register (i386_Register:Reg32_ESI)) & |
    ‘ EDI=’ & HEX (info.Register (i386_Register:Reg32_EDI)) & |
    ‘ ESP=’ & HEX (info.Register (i386_Register:Reg32_ESP)) & |
    ‘ EBP=’ & HEX (info.Register (i386_Register:Reg32_EBP)) & |
    ‘<13,10,13,10>Current thread is being terminated’

    MessageBox (0, S, Caption, MB_ICONHAND)
    RETURN 1      ! a positive value signals the RTL to kill the thread

    ! ——————————————————————————

    Test PROCEDURE (LONG a, LONG b)

    CODE
    a %= b

    ! ——————————————————————————

    HEX PROCEDURE (LONG A)

    i UNSIGNED,AUTO
    S STRING(8),AUTO
    DIGITS STRING(‘0123456789ABCDEF’),STATIC

    CODE
    i = SIZE(S)

    LOOP WHILE i <> 0
    S [i] = DIGITS [BAND (A, 0Fh) + 1]
    A = BSHIFT (A, -4)
    i -= 1
    END

    RETURN S

    ! ——————————————————————————


    These first two lines of code assign our exception handler function and then call the Test procedure that raises an exception:

    SYSTEM{PROP:LastChanceHook} = ADDRESS (Hook)
    Test (10, 0)  ! causes an exception

    The exception is trapped and we show the result in a MessageBox which looks like this:

    customexception

    our Hook PROCEDURE (*ICWExceptionInfo info) uses the methods in the interface to show the exception code, its address, and the values of the registers at the time of the exception. And remember we said that:

    “If a Positive number is returned, the RTL stops the thread (or the entire process if the exception occurred in the main process thread) without invoking the RTL exception handler.”

    in our example our Hook PROCEDURE does a “RETURN 1” and since we are running on the main thread then immediately after the MessageBox is displayed and the user presses the OK button the program itself is terminated.

    In a future article we’ll show you how to easily display the callstack so that your end-user can tell you exactly which procedure caused the exception. And we’ll be adding an option to the templates so that you can do the same with a couple of mouse clicks. You can download the source code for this example from this link