All posts by admin

Easing into Clarion 7 – Part 5 of 9 – Meet the Data/Tables Pad

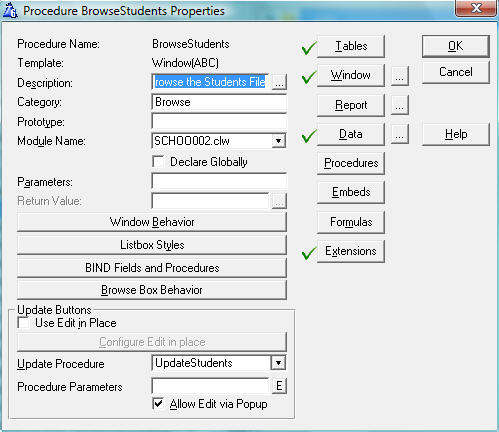
Experienced users of the Clarion 6 Application Generator may notice a change in their Clarion 7 Procedure Properties window.

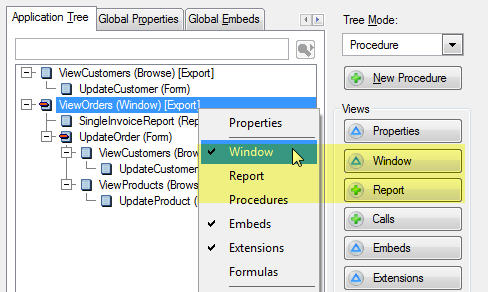
In Clarion 6, there were buttons in the Properties dialog that would “drill down” and identify key areas of any procedure:

browsestudentsc6

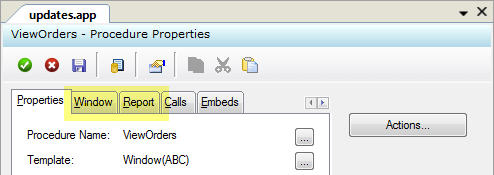
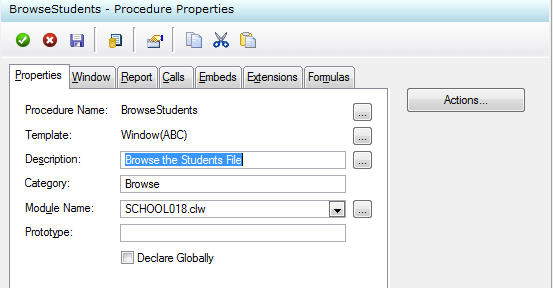
In Clarion 7, the buttons are essentially replaced by tab controls in the dialog as shown here:

 browsestudentsc7

But what has happened to the Data and Tables buttons that we saw in Clarion 6?

The answer is that they have been consolidated into a new and easy-to-use IDE pad named the Data/Tables Pad (DTP).

dtp1 
 

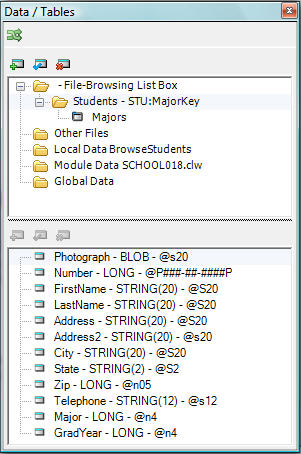
As you can see, table and application data are displayed and maintained from a single source pad. Press the F12 key at any time to open (or bring focus to) the DTP in the IDE. Buttons at the top of each list in the DTP allow
you to add, modify, or remove table and data elements where
appropriate.

So stated another way, this is the pad where all dictionary information, and global, module and local data for the application is displayed. This is also
the pad where new application data can be added if needed. The pad
is also a handy tool when the Window and Report Designers are active.

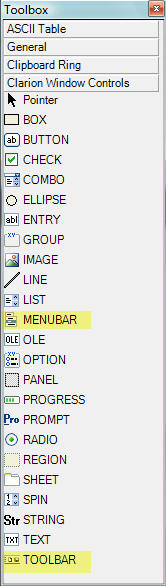
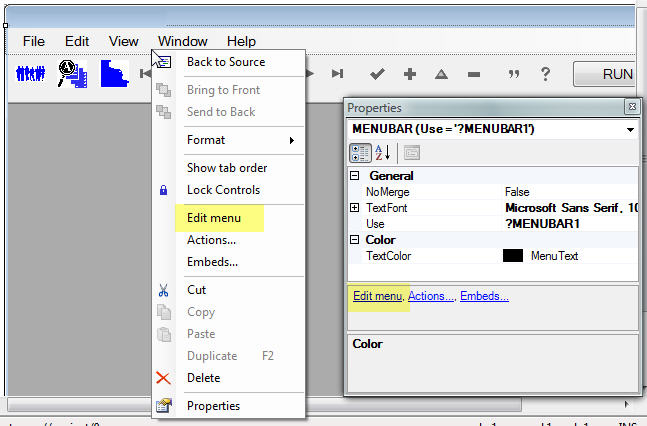
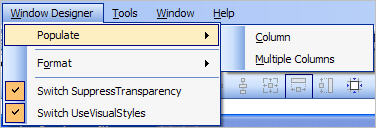
In the Window and Report Designers, drag a field (column) from the DTP to the window or report area for easy and quick population. The Populate Columns and Populate Multiple Columns functions that you used in earlier version are also available in Clarion 7 if you would prefer to use them instead. Access these utilities from the Window or Report Designer menus:

 dtp2

Just remember that anything data related (Global, Local, Dictionary Based, etc.) is always available from the Data/Tables Pad!

Easing into Clarion 7 – Part 4 of 9 – Windows, Reports, Toolbars, and Menus

First, the terms Window Formatter and Report Formatter of prior Clarion versions have been replaced with a simple and common term: Structure Designer.

In source code, access to the Structure Designer is available at any time by pressing the CTRL + D hot key. This is similar to the CTRL + F key that you used in earlier Clarion versions. You can also use the IDE Menu to access the Designer (Edit > Structure Designer).  

Of course, in the Application Generator, access to your Window or Report is still easily available from the procedure’s pop up menu, the Window or Report button, or through a new tabbed interface in the Procedure Properties dialog:

designers 

designerstab


The tabbed interface give you access to the generated window and report structures, where you can edit them directly as source if needed.

In upcoming topics we will look at the new Structure Designer in more detail. Let’s take a quick look at the Menu Editor.

The majority of applications that you create in Clarion start with some kind of menu system that allows you to launch other procedures. The most popular way to do this in MDI applications is with a Frame procedure.

In Clarion 6, a Frame procedure in the Window Formatter relied on the Menu Editor, and also on the Dynamic Toolbar and Menu IDE menu selections as shown here:

c6menutoolbars 

In the Clarion 7 Structure Designer, menus are added to windows through the Structure Designer’s Toolbox Pad:

 toolbox

From the IDE Menu, you can open the Toolbox at any time by selecting View > Toolbox. Of course, the Clarion Window Controls section with all of the controls shown above is only visible when the Designer is active.

To populate any control, use the mouse and drag a control from the Toolbox to the target location in the Window or Report area.

These are native controls and are not bound to any data or template support. We will look at those special controls in the next blog topic.

Populating a MENUBAR control enables access to the Menu Editor. In Clarion 7, the enhanced Menu Editor is available via the Structure Designer’s Properties Pad. You can also right-click on the MENUBAR and select the Menu Editor from the pop up menu.

 Both are shown below:

 editmenu

The Menu Editor has a very similar look and feel as it counterparts in earlier Clarion Versions, and is very intuitive in its use:

 menueditor

Note the toolbar highlighted above. Here, you can add new MENUs, Separators, ITEM’s, move them up or down, and access Actions and Embeds where needed.

To the right is the property control dialog, where every characteristic in the selected menu element can be accessed and modified. Examples of this are menu icons, colors, text, fonts and much more.

So that’s the basics in editing your application’s visual elements in Clarion 7. 

More to come!


Easing into Clarion 7 – Part 3 of 9 – New Application

To create a new application in Clarion 7, there are three options.

1. Use the hot key CTRL + SHIFT + N, and select Application as shown here:

newapp 
Enter your application Name, select the Location and folder options, and press the Create button. This will open the Application Properties window.

appprops 

This is the same interface that you were familiar with in Clarion 6 and prior versions. From here, you can proceed to open the Application Wizard, or bypass it and open the Application Editor.

 Alternatively:

2. From the Start Page, you can press the New Solution button from the appropriate category. This will open the same New Project dialog shown above.

OR

3. Use the IDE Menu option and repeat the same steps as outlined in (1).


Easing into Clarion 7 – Part 2 of 9 – New Dictionaries

To create a new dictionary in Clarion 7, there are three options:

1.  Use the hot key CTRL + N, and select Clarion Data Dictionary as shown here:

newdct

Click on Data Dictionary (or TAB and select via the Space bar), and click on Create (or press the Enter key). This will create a new DCT with a default name of Empty1.DCT.

As you save your changes in the dictionary you will be prompted to
rename it if needed.

2. Use the Start Page to create a new dictionary. Select the Dictionaries link and press the New Dictionary button. Using this technique, you will be asked to name your dictionary prior to entering the Dictionary Editor.

3.  Use the IDE New File Menu option and repeat the same steps as outlined in (1)


Easing into Clarion 7 – Part 1 of 9 – New Components

Now that the blogs are finally back, by popular demand I am reposting the “Easing into Clarion 7” series.

Back in Clarion 6, a NEW IDE item was limited to only 5 items:

 newc6

In Clarion 7, there are new Files (CTRL + N) and a new Solution, Project, or Application (CTRL + SHIFT + N)

What is a Solution?

To simplify it to basic terms, a solution is any IDE element whose end result (output) is a library or an executable. With that in mind, projects (*.cwproj) and applications (*.APP) are both considered parts of any solution.
All projects and template based applications must be contained within a solution.

The default file extension for solutions is *.SLN.

Project files in Clarion 7 use a *.cwproj extension, and are created for you automatically by the IDE. A new project window allows you to specify a custom hand -coded project or project application:

 newproject
 

This is an important and vital concept that is new in Clarion 7. Both applications and hand-coded source files use a project file. This project file contains all of the information that the IDE needs to build the hand coded project or application into a target output.

 The solution file can hold one or many projects, and this is where the new power of Clarion 7 begins to surface. One solution can be used to maintain a large multi-DLL application project, or it can be a simple as holding a single
hand-code project or application. Your choice!

 There are many ways to open each type of “New” dialog.

1. Using the Hot Keys (as documented above)

2. Opening new Files and Solutions (Projects and Applications) directly from the IDE Start Page:

newc72

Note that in the Start Page, new files are divided into 4 categories (Dictionaries, Diagrams, Tables, and Source Files)

Dictionaries are the same dictionaries that are used with the template based applications.

Diagrams call the new Dictionary Diagrammer, which provides a graphical tool for your dictionaries.

Tables call the new Database Browser, which allow you to browse files of all supported database formats.

Source Files open clarion language source files, which defaults to a CLW extension.

You can create all of these files in the Start Page, and also open existing ones!

3.  Launching a new file or solution from the IDE Menu.

 newsolution1

Of course, you can also open new files directly from the IDE menu. In the New File dialog, you can specify the file type to direct you to the appropriate area of the IDE.

In future articles, we will explore multi-project solutions in more detail.


Personal Development Resources